Sunday, September 27, 2015

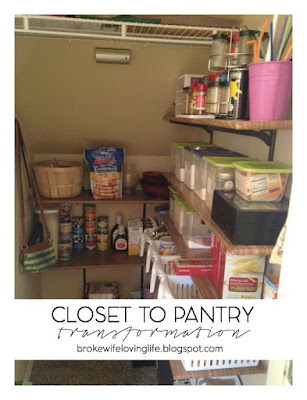
Closet to Pantry Transformation

Hello!

I know it's been forever since I've posted, going back to work has been exhausting!  We actually completed this project before we even moved in to our house, but I figured it was a good one to share!

Our kitchen has a pantry but it's the standard tiny 3 foot wide and 2 foot deep kind.  Since we don't have a ton of cabinet space, the real pantry houses all our appliances...crockpot,  blender, and such. 

We considered making a food storage area in the garage, but that would mean I would have to walk an extra 30 feet to get what I want and lets be real, that's not ideal.  Instead, we decided to transform our coat closet under the stairs into our pantry.  It's conveniently located in the kitchen and was really a huge waste of space.

We bought these tracks and these brackets from Home Depot and a sheet of particle board to make the shelves.  We measured the width of the closet and decided how long we wanted our shelves.  We did one 12" deep shelf, 8" deep on the others and 6" deep on the top one.  We brought the measurements to Home Depot and they cut our shelves for us.  Unfortunately, they're not exactly precise...but we don't have a saw so we made it work (just required some sanding and light hammering...). 


Now, particle board isn't exactly glamorous looking, but I'm cheap...the nice shelves are like eight bucks a piece...no thanks.  So I picked up some wood grain contact paper and wrapped the shelves like a present...I just stapled the paper on with a staple gun.


Containers are the key to a nicely organized pantry.  When your pantry is organized it's way easier to see (and know) what you have, so you don't end up with 3 things of baking powder.  I bought some of the containers at Walmart for a couple bucks and even got a bunch at Dollar Tree.  I find that things fit much easier if you empty them from their bag and into a container.  Each one is labeled, I have one for each of the standard baking items and then some that hold things like rice, tea, drink mixes, breakfasts, etc. We also installed a little motion sensing light to the ceiling since there wasn't an existing light.


I also have some baskets for the random stuff like crackers and chips and all my big plastic cups and water bottles.


I also have a little three drawer thing that holds baking accessories like sprinkles and food coloring. It's nice to have them easy to find and not having to dig through everything to find them since they're so small.


In addition to the shelving, we have a door rack that holds my Spark and protein mix I use everyday, paper towels and cleaning stuff. We hung a rack for brooms and such that also holds the dogs' leashes. I believe I got both of those at Walmart.


I also hang up my purses on a cup hook, it's nice to have them nearby but out of sight. I usually have everything in my Thirty One Bag I use for school but sometimes I need to make a quick switch to a smaller purse. I also hang up my running belt and stash our hats on the existing wire shelf.

We probably spent around $50 for the shelving, tracks and brackets, well worth it for all the extra storage.  The white containers with handles are $2.47 a piece at Walmart and the square plastic containers with the blue and green lids are from Dollar Tree...I'm pretty sure they came in two packs, but I got them a couple years ago.  Adding the pantry space under the stairs has got to be one of my favorite thing we did at the house, it has been so practical and useful!  


Wednesday, August 19, 2015

Classroom Voice Level Chart


In addition to all my crazy home projects, I also make a lot of stuff for use at school.  I have found that having a voice level chart is helpful for students, I use a clothespin to indicate which level voice is acceptable.  I made this cute voice level chart you can pick up at my Teachers Pay Teachers store here for free!  I printed mine on the school color printer (after all, it's for classroom use!) glued it on to card stock an then laminated it.  I used binder rings to hang the pieces together and hang it up on my whiteboard at the front of the room! 


Monday, August 17, 2015

Bathroom Mirror Makeover


Our bathrooms are on the top of my "to update" list for the interior of our home.  They have those old nasty crystal-y sink nobs, builder grade mirrors and big, gigantic lights.  When we repainted our kitchen cabinets (check out that post here), we also painted the vanity in the downstairs bathroom (the upstairs ones were already done, how nice), which also helped give a quick and cheap face lift.  Next thing to tackle was the huge, boring mirror.

I've been seeing DIY mirror frames all over Pinterest, so after some researching, I decided to give it a shot.  Luckily, I already had the moulding.  When the previous owner flipped our house, he installed new moulding and left us four 12ft sections of leftovers in the garage...perfect.  The only thing I actually had to purchase was the glue.  Make sure you get glue that is for mirrors!  I originally bought some heavy duty adhesive (I figured, it has to work it says HEAVY DUTY) but then read that it was absolutely not for use on mirrors.........so I went back and got this:


Unfortunately, 12ft pieces of moulding were not going to be easy to transport to my Dad's (so that he could do the hard work with the chop saw) so Steve and I did some rough measurements and he cut them down to a more manageable size.  We actually added moulding to all three of our bathroom mirrors so, after we cut them, I labeled them so I wouldn't forget which piece went to which mirror.  Dad cut 45 degree angles on the edges and made sure the pieces fit together to make a nice frame.

(make sure you have the same edge on the outside...my moulding was thicker on one edge than the other, we put the thinner edge on the outside)

Like many other people's experience, those lovely builder grade mirrors come with lovely builder grade mirror clips.  Some people recommended replacing them with flat washers but I wasn't about to take anything apart and screw it up, so instead I whipped out the dremmel and created some notches to fit over the clips.  I just held the moulding up on the mirror and marked with a pencil where the clips were and went to work using the wood cutting attachment.


I then set to work gluing the pieces directly to the frame.  Looking back, I should have painted the back of the moulding first because you can see the edge of in the reflection of the mirror, but it's not really that big of a deal.  (I don't suspect people will be inspecting my mirror that closely, but now if you're at my house I'm sure you will...


You want to make sure your glue isn't too close to the edge of the moulding or it will seep out and you can see it in the reflection of the mirror.  I made this mistake on one piece but once again, it's not that big of a deal...my vase covers it up! I stuck the moulding to the mirror and had to press it on for a minute or so for it to adhere, then I just taped it up with some masking tape.

 (notice the nice streak of glue on the mirror...I didn't hold the top piece on long enough and it slipped...the glue came right off with some denatured alcohol though!)

I left the mirrors to dry overnight and came back with some caulk the next day.  The piece didn't fit together perfectly but I just filled in the gaps with paintable caulk and it was fine.  Definitely make sure you smooth out your caulk though because sanding it is a realllllll pain. I let that dry for a few hours and then painted the moulding using left over paint from our kitchen cabinets.  Then about two weeks later, finally got it glazed and coated it with the protective sealant that came in the kit for the kitchen.


They really add a lot to the bathrooms and make them look way more expensive.  They look more finished and put together, especially since they match the cabinets.  I can't wait to get new faucets and light fixtures to really finish the update!

The top few things to remember if you are going to do this project yourself:

1. paint the back of your moulding before you glue it on
2. don't put glue too close to the edge of your moulding
3. press your moulding to the mirror for a bit to let it adhere before taping it


Here's the price breakdown for the supplies:

36ft of moulding (about 12ft for each mirror) $20.00 (about $7 for a 12ft piece)
glue $5.00
caulk $2.50
caulk gun $7.00
masking tape $3.00
paint (I used left over, but a quart will run you around 10 bucks)
TOTAL: about $40 for 3 mirrors or about $13 per mirror!


Saturday, August 1, 2015

Budget Patio


As much as I love our home, it's not exactly great for entertaining.  I love to have people over but we really don't have the space inside for more than a few people, so we decided to expand our outdoor entertaining area.  Our backyard was pretty bare (with the exception of the bamboo plant from hell...if you know me, you have probably heard me talk about it) when we moved in, but there were some things that we could take advantage of...like the 100 pavers around the perimeter of the house.


(See those lovely red things?  And the bamboo plant...)

To the right of the existing patio was a complete disaster when we moved in.  It was essentially like walking in a swamp, you sunk in at least a few inches with each step.  We remedied this by installing a french drain (all by ourselves, I wish I had pictures for a post!) and planting some water loving aborvitaes. There is also a small deck over there which is in poor shape.  We're planning to put the outdoor dog kennel on it.  We knew that that area really wasn't very practical as it was currently being used, so expanding the patio was our best bet.  We had originally thought about building a deck or having a patio poured, but we quickly found out that was WAY out of our budget of less that $200. So I did some research and was really inspired by this paver patio by Amelia at House Pretty Blog:


(she has a great post about how she did her patio, check it out here)

So I ripped out about half of the pavers and stacked them on the existing patio.
 (This happened about 2 months prior to me actually working on the patio...Steve moved the rest of them while the patio was in progress, I was totally over moving them)

I set to work killing all the crabgrass and such by laying down cardboard over the area for a few weeks.  It totally did the job!  Anything that was left got sprayed with RoundUp and ripped out, until I was left with just a huge patch of dirt. Then I put down some weed preventer which Steve watered in for me.


Next, we laid down some landscape fabric.  I used landscape pins to hold the fabric down but didn't have enough so we just used a few rocks in places too.


(I had to run to the store to get more fabric because I totally forgot we used all of it when we made our raised bed...ugh...the light colored one is all I had left)

The next step was to start bringing in the sand.  We got 2 yards from our local landscaping supply for $60.  I used their calculator and found out that I needed 1.5 yards to cover the whole area at a 2 inch thickness, but one part of it had a big slope, so I wanted more to make everything level.  You really need to buy your sand from landscaping supply...it's four bucks for half a cubic foot at Home Depot and there's 27 cubic feet in a cubic yard...I'm sure you can imagine how much that adds up to.  We laid down some 2x4's along the fence so that the sand won't shift as much over time (thanks Dad for the tip) and brought in sand with a couple of wheelbarrows.  Leveling the sand was by far the most difficult part of this entire project.  I used a 2x4 and a level and basically drug the thing across the sand, adding and subtracting sand as necessary, until it was pretty much level.  Steve then went through with our fancy homemade hand tamper to compact the sand.  (It was $26 to buy one at Home Depot...and you know I'm not spending that if I don't have to.  )


Finally, it was time to start laying the pavers.  I just eyeballed where the center of the deck was and placed my first paver there, then used a 2x4 as a spacer to lay the rest of them.


(I came to realize that the fence line and the flower bed are not straight, but oh well that's a project for another day!)

I laid out the rest of the pavers and also a border at the end with the same scalloped edging you see above. We were finally ready to add the pea gravel.  We bought a yard, though it ended up begin a little more than we needed.  We laid a few pieces of particle board down to make it easier to bring in the gravel.  Steve brought it over with a wheelbarrow and I used a shop brush to spread it out.  I had to use a shovel to get it into some of the small spaces, but for the most part I just pushed it around with the broom. For a about $120 (see price breakdown below) we ended up with a beautiful new place for entertaining.  We still have to hang up the party lights and install the dog kennel on the deck.


100 pavers = $0 (we had to dig them out of the yard, but they're about $1 a piece a the hardware store)
2 yards of coarse sand = $60
1 yard of pea gravel = $30
1 roll of 3'x100' landscaping fabric = $15
Fabric pins = $5
Lanscape border = $10


Sunday, July 26, 2015

DIY Script Sign


Hello there!

We used to have some lovely chef themed plaques hanging above our kitchen window until I found that one had seemingly fallen off the wall at some point.
(either that or our house is haunted...)
I had been looking around for something interesting to put above the window and found a quote that I really loved and thought would be nice to have hanging in the house.


With my husband being out of town, it was a perfect time to set about crafting.  I went rummaging around my dad's garage and found the perfect piece of wood that used to be part of an old table.  Lucky for me, it already had some nice antiquing, so I didn't have to do anything extra.  I just cleaned it off with some mineral spirits.


Now, some people have the talent necessary to create beautiful script writing.  I am not one of those people. So here's the trick I use to make pretty things with pretty writing.  I downloaded the font Bombshell Pro (for free, of course) and typed up the quote in Word.  I blew it up to something like 150 size font and printed it out.  It's only in red because I didn't have any black ink.  The next step is to color over the back of the print with pencil.  You want to make sure you cover every part of the writing.  What you are doing is essentially creating a carbon transfer.


Next, I laid out my sheets of paper to get an idea of how it was all going to work out.


Luckily, it all fit on there pretty perfectly.  I then used a rotary cutting ruler to make sure my words would be straight.  I lined up it up with the edge of the board and the bottom of my piece of paper, then taped the paper down with masking tape.


To transfer the pencil onto the surface, you just trace over the outline of the font with pen.  You want to push pretty hard.  Before I painted I went over the words again in just pencil so that I could see them easier.  If you're working with a lighter surface, this won't be necessary.


Repeat the lining up and the tracing until you've done the whole thing.


If you look closely you can see a few different words. It's ok if it's not perfect since you're just going to paint over it.

I used a small paintbrush and this metallic acrylic paint that I got at Target for a couple bucks to do the painting.  I wasn't sure if it was going to be opaque enough, but it turned out just fine!


In all this project took probably 2 hours.  Overall though I'm very happy with the finished product!  Don't be afraid to tackle something with pretty lettering, it's really easy using this carbon transfer method!


Sunday, July 12, 2015

Garage Floor Makeover


So when we bought our house back in January we had a...well..."interesting" garage situation. The garage was previously used as some sort of living quarters...we're talking full wall to wall carpet and nicely painted walls that match the interior of the house. That's all well and good but...my husband is a mechanic and wants to do mechanic-y things in the garage.  And thus lead to our purchase of this:


We got it at Home Depot for somewhere around $100.  We also bought it in the dead of winter...after reading the instructions we realized this project was going to have to wait until we had MUCH warmer weather...the concrete in your garage has to be something like 60 degrees before you paint.

Steve took over the wonderful job of removing the carpeting from the garage and many months later, I set out to apply the epoxy.  We were left with a bunch of nail holes in the concrete from pulling out the carpet. Before painting, I went through and filled all of them in with concrete crack filler.


(There were A LOT of holes...it was like this around the perimeter of the garage...not a pleasant experience)

I went through and filled all the holes like so...I just squeezed some filler in the holes then went over it with a putty knife to smooth it out.  I then let it dry for 24 hours (as according to the directions).


We don't have a ton of stuff in our garage, but enough that I was not willing to leave it in my driveway for at least 24 hours while the flooring sealed, so I moved everything to one side of the garage and set to work.  

The first step is to use the etching salt.  You'll need to drag your hose into your garage for this step and have a watering can handy. First you need to wet your floor. Then, you mix the salt and 2 gallons of water together in the watering can and then pour it on your floor in about a 4x4 foot section at a time and scrub away with a brush.  We had a sturdy bristle broom that I used but they say a wire bristle brush would be best.
 (I was not about to go out and spend money on one)

 After you're done scrubbing each section, rinse it off and move on to the next until you've done the whole area you're going to paint.  My garage took a couple hours to dry completely, I just left the garage cracked and ran a couple errands in the mean time. 

The epoxy comes in a two part system.  You have to mix the two parts together...I mixed mine in a 5 gallon bucket because I wasn't sure there was enough room in one of the paint cans for both parts. You only have about an hour or so to work before the epoxy starts to cure so make sure you have all your painting materials ready before you mix the paints!  I went around and cut in with an angled brush (I LOVE the Wooster ShortCut) and then started painting using a roller attached to a pole.


I painted a 3 to 4 square foot section at a time and then threw down the paint chips that come with the kit.  They're completely optional but we decided to go for it.  I poured them out of the bag into a bowl so I could grab handfuls easier.  You pretty much just throw them up above the painted area and the spread out nicely as they fall down.  I repeated this process until I had covered the whole area. Here you can see what the paint chips look like...next to my feet for scale!


I did the other half of the garage a few days later and then let it dry overnight before I started putting things away.


(We also painted the door from the garage into the house black when we moved in.  Steve anticipated having greasy and dirty hands and didn't want to mess up our white door, so we painted it!)


I'm also pretty happy with the new use for the pallet that Steve's toolbox came on.  It keeps everything corralled an prevents stuff from falling over.


The next step is to get some more hanging storage and get a workbench so we can clear up some more space and have a place to put all the random odds and ends!

The epoxy will be nice for Steve to work on because it prevents any oils from soaking into the concrete, you can pretty much just wipe it up.  The whole process was easy, but time consuming.  The only thing that was a pain was the clean up. I had to make sure to really rinse my paintbrush and roller out well so that they wouldn't harden from the epoxy. The kit come with a how-to instruction video that is helpful too! 
(though it is absolutely hilarious how much the woman in it seems to be loving throwing the paint chips...you should probably watch it just for a laugh)
I would definitely recommend this product...we used Rustoleum when we did our kitchen cabinets and that company totally came through for us again with the garage epoxy!